Securing personal and sensitive files is fairly simple by using VeraCrypt, a free
open source disk encryption software that you can use on macOS, Windows, and Linux.
For macOS users, you need to have FUSE for macOS installed.
It provides an on-the-fly volume encryption and no files stored on the encrypted volume can be read without the correct password,
keyfiles, or encryption keys.
I use this to encrypt/decrypt the thumb drive attached in my keychain so no one can access my files in case it gets lost. Best
of all, I can open the drive on all my computers with different OSes.
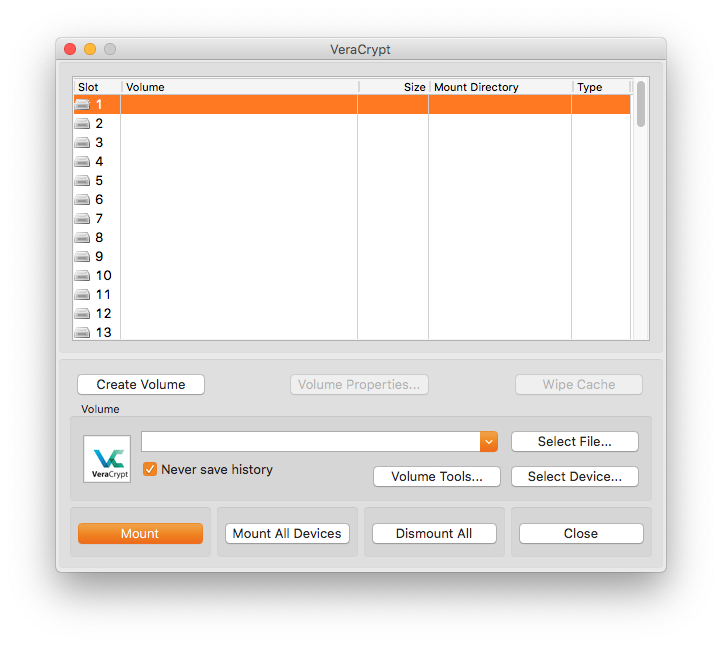
Veracrypt has a GUI that you can use to mount your encrypted files and drives.
You can create a virtual encrypted disk or encrypt an entire partition or storage device such as flash drive.
Creating a Virtual Encrypted Disk
A virtual encrypted disk is a volume in the form of a file. This is recommended for inexperienced users.
- Click the "Create Volume" button on the VeraCrypt window. The Volume Creation Wizard window will appear.
- Select "Create an encrypted file container" then press "Next".
- Select "Standard VeraCrypt volume" then press "Next".
- On the "Volume Location" page, click the "Select File..." button and set the location where you wish the container to be created. Then, click "Next".
- On the "Encryption Options" screen, leave the algorithm on default setting then click "Next".
- On the next window, specificy the desired Volume Size then click "Next".
- Secure the volume with a good password then click "Next".
- On the "Format Options" page, select "FAT" filesystem type on the dropdown, then click "Next".
- On the "Volume Format" section, move your mouse as randomly as possible within the dialog window to generate random values for encryption then click the
"Format" button. - Click "Exit" on the next page once operation has succeeded.
For device encryption and advanced setup, please visit the documentation online.
Mounting a VeraCrypt Encrypted Disk
When you attach a VeraCrypt-encrypted device, your OS may warn you that it is not formatted correctly. Ignore this and do not reformat the device. You need
to use VeraCrypt to mount it.
- On the VeraCrypt main window, click "Select File..." (virtual encrypted disk) or "Select Device..." (encrypted partition or device), locate the file or disk
that you wish to mount then click "OK". - Highlight the slot where you want to mount the volume on the listbox then click "Mount".
- Enter the password of the volume on the password input of the dialog that will appear. Click "OK".
- Wait for the mounting for the complete, which may take a while. If you enter a wrong password or key, do step 3 again.
- If successful, the file will be mounted as a device volume on your system. Access the volume using a file explorer (Finder, Windows Explorer, etc.)
like you would normally do when you attach a flash drive.

Further Reading
As software developers, we use terminal emulators for tasks like compiling, version control, and remote machine management. Normally, we
do these concurrently in different terminal windows.
If you're using iTerm 2 for macOS, you can use its tabs and split panes feature. But
for any other Linux/Unix and SSH terminal emulators, you can use tmux (terminal multiplexer).
Tmux is an alternative to GNU Screen that allows you to multiplex several virtual consoles
in a single window, useful for running multiple CLI programs at the same time.
Installation
Package Manager
Install the tmux package using your system's package manager.
macOS (Homebrew)
brew install tmuxUbuntu/Debian
sudo apt-get install -y tmuxFrom Source
git clone https://github.com/tmux/tmux.git
cd tmux
sh autogen.sh
./configure && makeImportant: requires at least a working C compiler, make, autoconf, automake, pkg-config as well as libevent and ncurses
libraries and headers.
How to Use
Type tmux in your terminal to start a new session. The display will be cleared and a status bar with time and date will appear at the bottom
of the terminal screen indicating tmux is running.
You send commands to tmux via shortcut keys, which are prefixed by Ctrl-b. That is, you press the prefix (Ctrl-b) keys first then the
desired shortcut command.
Basic Commands
Below are the default basic commands in Tmux. This can be configured in a tmux.conf file in your $HOME directory.
Windows
Active windows are listed on the tmux status bar.
| Command | Shortcut |
|---|---|
| Create window | Ctrl-b, c |
| Rename current window | Ctrl-b, , |
| Close current window | Ctrl-b, & |
| Next window | Ctrl-b, n |
| Previous window | Ctrl-b, p |
| Last active window | Ctrl-b, l |
| Select window by number | Ctrl-b, 0...9 |
Panes
Panes are divisions/splits of independent virtual terminals inside a window.
| Command | Shortcut |
|---|---|
| Split pane vertically | Ctrl-b, % |
| Split pane horizontally | Ctrl-b, " |
| Switch to last active pane | Ctrl-b, ; |
| Move current pane left | Ctrl-b, { |
| Move current pane right | Ctrl-b, } |
| Switch to pane to the direction | Ctrl-b, ↑ or ↓ or ← or → |
| Close current pane | Ctrl-b, x |
| Toggle pane zoom (aka maximize) | Ctrl-b, z |
| Move to next pane | Ctrl-b, o |
| Convert pane to window | Ctrl-b, ! |
| Switch to pane by number | Ctrl-b, q, 0...9 |
Misc
| Command | Shortcut |
|---|---|
| Enter command mode | Ctrl-b, : |
| Show shortcuts list | Ctrl-b, ? |
More Shortcuts
For advanced shortcuts, you can visit this cheat sheet for reference.
Configuration
This Arch Linux Wiki contains a comprehensive guide on how
to configure your tmux setup such as adding or modifying shortcut keys, layouting tricks, Vim/Emacs keybinding,
mouse support, etc.
Asciinema
Here's a demo of tmux in action.
We primarily use Backlog in our software development process, a web-based project management tool.
For those who love working in terminal emulators, you'll be glad to know that they have a public API for fetching Backlog data (notifications, issues, projects, etc.). With the API, you can
access and update these data from your terminal via cURL or scripting.
You can view the Backlog API documentation here. Basically, you need to be authorized and authenticated first before you can access the desired resources.
For personal use, using API keys would be the ideal way to use the Backlog API.
Authentication via API Key
You can generate an API key from your account settings.
- Sign in to your space
https://xxx.backlog.com. Your space may have a different domain/url. - Click your avatar icon on the upper right corner of the dashboard to trigger the dropdown menu. Choose Personal Settings → API.
- From API Settings screen, add a memo then click Submit to generate an API key.
- Copy an API key from your Registered API keys list.
- Perform API calls using this key to desired endpoints listed on the official API list.
Example
Backlog URL: https://xxx.backlog.jp
API KEY: mykeycopy1
Where xxx is your Backlog Space key.
Get Space Info
Request
curl "https://xxx.backlog.jp/api/v2/space?apiKey=mykeycopy1"Response
{
    "spaceKey":"xxx",
    "name":"xxx",
    "ownerId":0000001,
    "lang":"ja",
    "timezone":"Asia/Tokyo",
    "reportSendTime":"09:00:00",
    "textFormattingRule":"markdown",
    "created":"2012-08-03T05:00:27Z",
    "updated":"2017-05-15T06:43:16Z"
}
Notifications
To fetch Backlog notifications, we will use the Get Notification API endpoint.
| Description | Value |
|---|---|
| Method | GET |
| URL | /api/v2/notifications |
Query Parameters
| Parameter | Type | Description |
|---|---|---|
| minId | Number |
minimum ID |
| maxId | Number |
maximum ID |
| count | Number |
number of records to retrieve(1-100) default=20 |
| order | String |
“asc” or “desc” |
| senderId | Number |
sender ID |
Notification Fetch Script (Ruby)
This time, we will fetch our Backlog notifications through the API using a Ruby script.
Required Gems
jsonrest-client
Source Code
Save the script below into a file named bklog-notif.rb and update it to suit your needs.
#!/usr/bin/env ruby
require 'json'
require 'rest_client'

class BacklogNotification
  @url
  @data
  REASON = {
    1  => "%s assigned you to an issue.",
    2  => "%s added a comment.",
    3  => "%s added an issue.",
    4  => "%s updated an issue.",
    5  => "%s added a file.",
    6  => "%s added you to a project.",
    9  => "%s did something.",
    10 => "%s assigned you to a pull request.",
    11 => "%s added a comment on a pull request.",
    12 => "%s added a pull request.",
    13 => "%s updated a pull request."
  }

  def initialize(apiKey)
    @url = sprintf("https://xxx.backlog.jp/api/v2/notifications?apiKey=%s", apiKey)
  end

  def fetch(count)
    begin
      @data = JSON.parse(RestClient.get(@url + "&count=#{count}"))
    rescue
      puts "API inaccessible."
      exit(1)
    end
  end

  def getNotifications(count = 20)

    # We can only fetch 1-100 notifications based on API.
    if count < 1 or count > 100
      puts 'Sorry, can only fetch 1-100 notifications.'
      exit(1)
    end

    fetch(count)

    # API call failed.
    if defined?(@data) == nil
      puts "Unable to fetch data."
      exit(1)
    end

    # No notifications to show.
    if @data.length == 0
      return "No notifications."
    end

    # Iterate through all available notifications.
    output = ""
    @data.each do |notification|
      author = notification['sender']['name']
      comment = notification['comment']
      created = notification['created']
      createdFormatted = Time.parse(created).strftime("%F %H:%M")
      issue = notification['issue']
      project = notification['project']
      reasonId = notification['reason']

      projectKey = project && project['projectKey']

      # Add [issuekey -> status] output.
      issueProgress = ""
      if issue != nil
        issueKey = issue && issue['issueKey']
        issueStatus = issue && issue['status']
        issueProgress = sprintf(" [%s → %s]", issueKey, issueStatus['name'])
      end

      # Concat notification output string.
      notificationMessage = notification['alreadyRead'] ? " " : "*"
      notificationMessage += "[#{createdFormatted}] [#{projectKey}] "
      notificationMessage += sprintf(REASON[reasonId], author)
      notificationMessage += issueProgress

      output += notificationMessage + "\n"
    end

    return output
  end
end

# Fetch notifications from Backlog account.
apiKey = "myapikey"
client = BacklogNotification.new(apiKey)
puts client.getNotifications()
Running The Script
Run the Ruby script to fetch notifications.
ruby bklog-notif.rbAlternatively, you can chmod the file and execute it this way:
chmod +x bklog-notif.rb
./bklog-notif.rb
You can save the script somewhere and add it to your PATH so you could run your script anywhere!
Sample Output
It displays your recent 20 notifications in a human-readable format.
 [2019-06-25 02:31] [NVL] b.lee updated an issue. [NVL-21 → 完了]
 [2019-06-25 02:27] [NVL] b.lee updated an issue. [NVL-22 → 完了]
 [2019-06-21 04:07] [IS] j.chan added a comment. [IS-1 → 完了]
 [2019-06-17 09:54] [NVL] b.lee updated an issue. [NVL-26 → 処理済み]
 [2019-06-17 07:24] [NVL] b.lee added a comment. [NVL-26 → 処理済み]
 [2019-06-17 06:57] [NVL] b.lee updated an issue. [NVL-25 → 完了]
 [2019-06-14 09:59] [NVL] b.lee added an issue. [NVL-26 → 処理済み]
 [2019-06-14 09:26] [NVL] b.lee added an issue. [NVL-25 → 完了]
 [2019-06-14 00:41] [SPF10] j.chan added you to a project.
 [2019-06-13 05:01] [IS] j.chan added you to a project.
 [2019-06-13 01:51] [NVL] b.lee updated an issue. [NVL-19 → 完了]
 [2019-06-10 08:32] [NVL] b.lee updated an issue. [NVL-21 → 完了]
 [2019-06-10 01:58] [NVL] b.lee added an issue. [NVL-22 → 完了]
 [2019-06-07 06:20] [NVL] b.lee added an issue. [NVL-21 → 完了]
 [2019-06-06 11:19] [NVL] b.lee added an issue. [NVL-20 → 完了]
 [2019-05-30 08:36] [ASDF_DEV0] j.chan added a comment. [ASDF_DEV0-378 → 処理済み]
 [2019-05-16 09:02] [ASDF_DEV0] j.chan added a comment. [ASDF_DEV0-378 → 処理済み]
 [2019-05-12 11:10] [ASDF_DEV0] s.jobs updated a pull request.
 [2019-05-12 08:00] [ASDF_DEV0] j.chan updated a pull request.
 [2019-05-09 04:23] [ASDF_DEV0] j.chan updated a pull request.
For developers working with files inside Vagrant, you might not be aware that the default
synced folder configuration is slow for large files and folders.
We encountered this problem when working with Symfony projects and it seems to be
a known issue with Vagrant.
Benchmark
Below is the specs and setup of the machine used for the test environment.
[Host]
MacBook Pro 13" 2016
OS: macOS 10.14.5 (Mojave)
CPU: Intel Core i5 2.0 GHz
RAM: 8 GB 1867MHz LPDDR3

[Guest]
OS: Ubuntu 16.04 (Xenial), Linux Kernel 4.4.0
vCPU: 2
vRAM: 2GB

[Synced Folder]
Symfony-based Project with Node.js
Disk Usage: 542MB
Items: 65,225
var: 210MB (4973 files)
node_modules: 171MB (32,092 files)
vendor: 140MB (24,070 files)
We can measure the I/O performance by running a find . command inside the synced folder of the virtual machine.
bizwind@macbook-pro:~$ vagrant ssh
vagrant@ubuntu-xenial:~$ cd /vagrant && time find .  > /dev/null
real    0m11.775s
user    0m0.012s
sys     0m6.936s
The find process took about 11.77 seconds to complete. In the host, it took only 0.70 second.
Solutions
To improve our Vagrant box's performance, we discovered the following tricks:
NFS (Network File System)
NFS does not work on Windows hosts.
This option attaches and shares the target directory and files with your virtual machine over a network.
It is faster than the default VirtualBox filesystem but not as fast as the native filesystem.
Prerequisites
- The host machine must have
nfsd(NFS server daemon) installed. - The guest machine must have NFS support installed. Vagrant usually sets this up automatically. If not,
install it using the guest OS' package manager (yum,apt, etc.) - Private network setup if using VirtualBox as the provider.
Enabling NFS Synced Folders
Simply add type: "nfs" flag onto your synced folder:
# Vagrantfile
config.vm.synced_folder ".", "/vagrant", type: "nfs"
Permissions
Running a Vagrant machine with NFS requires an administrator password to modify the hosts files.
macOS Mojave
The NFS exports breaks in macOS Mojave.
To fix this, open System Preferences > Security & Privacy > Privacy and add your terminal app (or any app
that you use to launch Vagrant) to Full Disk Access and Accessibility.


You can find the discussion about this on this GitHub issue.
Caveats
NFS sync comes with some quirks that you need to watch out for.
Delayed sync
When editing files in the host, there will be some delays before the changes show up in the guest. To
increase sync speed, lower actimeo (attribute caching timeout) mount option to 2 or 1 second.
config.vm.synced_folder ".", "/vagrant",
    type: "nfs",
    mount_options: ['actimeo=2']
You can set actimeo to 0 (disabled) to guarantee faster sync but it will decrease performance through
additional latency, network load, and server load.
File Watchers
File watchers like gulp-watch or gradle --continuous running inside the VM won't be able to detect changes
when files are edited on the host because the inotify API that they
commonly use doesn't work with NFS-mount directories. There are workarounds for this:
Polling
Polling actively waits for one of a set of file descriptors to become ready to perform I/O. This is the simplest
solution if your build tool supports it.
Here are some sample configurations:
// Webpack
module.exports = {
    watchOptions: {
        poll: 1000 // Check for changes every second
    }
};

// Gulp
const { watch } = require('gulp');
watch(['input/*.js', '!input/something.js'], { 'usePolling': true }, function(cb) {
    cb();
});
Vagrant Plugins
If polling is not an option, these plugins can help. These require installation and restart of the virtual machine.
- vagrant-notify-forwarder - forwards filesystem events
from the host to the guest automatically on all shared folders. - vagrant-fsnotify - runs a process for listening for
filesystem events on the host and, when a notification is received, runstouchorrminside the vm, causing
an event to be propagated on the guest filesystem.
Benchmark
With NFS, running the same find . command took 5.12 seconds to complete -- about 78% faster than the
default VirtualBox shared folder.
vagrant@ubuntu-xenial:/vagrant$ time find . > /dev/null
real    0m5.121s
user    0m0.060s
sys     0m1.944s
Avoid syncing large folders
The temporary, cache, and package directories usually contain the most number of files in a project. If possible, moving these directories
outside the sync folder can further help reduce the sync load and improve the performance of your virtual machine.